Wound Care Basics: How to Clean, Dress, and Prevent Scars at Home
You cut your finger while chopping vegetables. It stings, it bleeds, and suddenly you’re staring into the medicine cabinet wondering what actually helps and what might make things worse. We’ve all been there. The problem is that decades of old wives’ tales-like pouring hydrogen peroxide or alcohol on a fresh cut-are still floating around, and they are actively damaging your skin.
Proper wound care isn’t just about stopping the bleeding; it’s about creating the right environment for your body to rebuild tissue efficiently and with minimal scarring. According to data from the Centers for Disease Control and Prevention (CDC), improper care leads to preventable infections in up to 15% of minor injuries. But when you follow evidence-based protocols, you can slash that risk to under 5% and speed up healing by nearly half. Let’s break down exactly how to handle a wound, step by step, so you can heal faster and look better afterward.
The Physiology of Healing: Why Moisture Matters
Before you grab the bandages, it helps to understand what your body is doing. Wound healing isn’t a single event; it’s a four-stage biological process that starts the moment injury occurs. First comes hemostasis, which is the immediate clotting phase that stops bleeding within minutes. This is followed by inflammation, where your immune system rushes in to fight bacteria. Then comes proliferation, where new tissue forms, and finally, remodeling, where the scar matures over months or even years.
The biggest mistake people make is letting a wound dry out and scab over. A scab is essentially a barrier that forces new skin cells to migrate underneath it, which is slow and prone to tearing. Modern medical consensus, supported by the Wound Healing Society, founded in 1994, emphasizes maintaining a moist environment. When you keep a wound moist with ointment and a dressing, epithelial cells can move across the surface much faster. Studies show this reduces healing time by 30-50% compared to open-air drying.
Step 1: Cleaning the Wound Correctly
Cleaning is the most critical step because it removes debris and lowers the bacterial load. However, you need to do it gently. Aggressive scrubbing damages the delicate new tissue trying to form. Here is the protocol recommended by the Mayo Clinic and other health authorities:
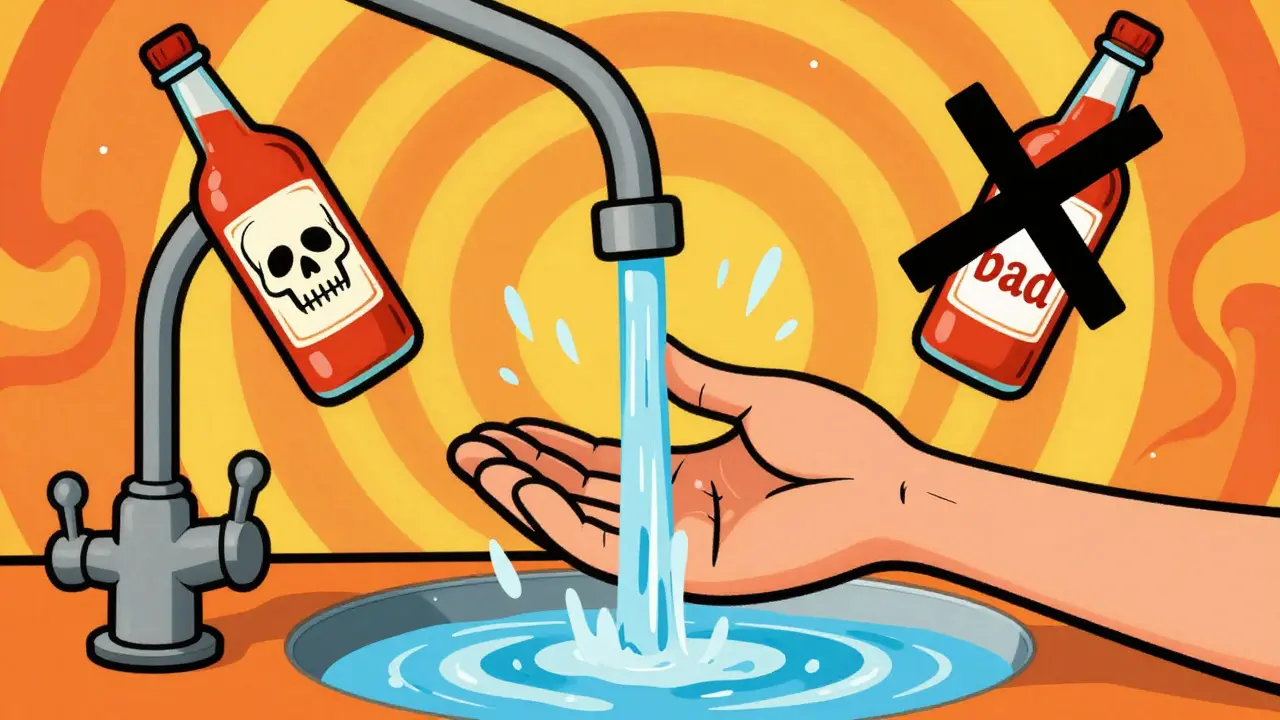
- Rinse with running water: Hold the wound under cool, clean tap water for 5 to 10 minutes. Running water is superior to stationary washing because it physically flushes away contaminants. This simple action can reduce infection risk by 40%.
- Use mild soap around the edges: Wash the skin surrounding the wound with mild soap and water. Avoid getting soap directly inside the wound, as it can cause irritation and delay healing.
- Remove debris carefully: If there is dirt or glass that doesn’t rinse out, use tweezers cleaned with alcohol to gently pick it out. Do not dig deep.
- Avoid harsh chemicals: Never use hydrogen peroxide, iodine, or rubbing alcohol on an open wound. While these kill bacteria, they also destroy healthy human cells. Research from the University of Wisconsin Health Services indicates these substances can delay healing by up to 50% by prolonging the inflammatory phase.
If the wound is bleeding heavily, apply direct pressure with a clean cloth for 10 to 15 minutes. Do not peek to check if it has stopped; lifting the cloth disrupts the clotting process.

Step 2: Choosing and Applying Dressings
Once the wound is clean and dry, you need to protect it. The goal is to maintain moisture without trapping too much fluid, which can lead to maceration (where the skin turns white and soggy). The type of dressing you choose depends on the amount of drainage (exudate) the wound produces.
| Dressing Type | Best For | Key Benefit | Change Frequency |
|---|---|---|---|
| Non-stick gauze + Petroleum Jelly | Minor cuts, scrapes | Inexpensive, maintains moisture | Daily or when wet/dirty |
| Hydrocolloid | Low-exudate wounds, blisters | Creates gel-like cushion, stays on longer | Every 3-7 days |
| Foam Dressing | Moderate to heavy drainage | Highly absorbent, protects surrounding skin | Every 1-3 days |
| Alginate | Heavy exudate, cavity wounds | Absorbs significant fluid, forms gel | When saturated |
For most household cuts, a simple non-stick pad covered with petroleum jelly works best. Apply a thin layer of bacitracin or petroleum jelly to keep the wound moist. Bacitracin is an antibiotic ointment recommended by 87% of healthcare providers for minor wounds to prevent infection. However, note that some dermatologists argue plain petroleum jelly is equally effective with a lower risk of allergic contact dermatitis (3.2% vs 8.7%).
When changing dressings, be gentle. If the bandage sticks, soak it with warm water before peeling it off. Pulling hard can tear new tissue and restart the bleeding. Always wash your hands before and after touching the wound area to introduce fewer bacteria.
Step 3: Scar Prevention Strategies
Scarring is part of the natural healing process, but you can significantly minimize its appearance. The key is consistency during the remodeling phase, which lasts from 21 days up to 1.5 years. Here are three evidence-based strategies to keep scars faint:
- Silicone Gel or Sheets: Applied after the wound has fully closed (usually around day 14), silicone products are the gold standard for scar management. A study in the Plastic and Reconstructive Surgery journal found that silicone reduces hypertrophic (raised) scarring by 50-60%. It works by hydrating the scar tissue and regulating collagen production.
- Sun Protection: New skin is highly sensitive to UV rays. Sun exposure can cause hyperpigmentation, turning a pale pink scar into a dark brown mark that may last permanently. Dermatologists recommend applying SPF 30+ sunscreen to the healed area for at least 12 months. This alone can reduce pigmentation issues by 80%.
- Moisturization: Keep the scar hydrated with petroleum jelly or a dedicated scar cream. Dry scars itch more, and scratching them breaks down the tissue, leading to wider, more noticeable scars.
Don’t pick at scabs. Picking increases the risk of infection by 35% and guarantees a deeper, more visible scar. Let your body do the work.

Red Flags: When to See a Doctor
Most minor wounds heal on their own, but some require professional intervention. You should seek medical attention immediately if you notice any of the following signs of infection or complications:
- Spreading Redness: Redness extending more than 1 inch from the wound site often indicates cellulitis, a serious skin infection.
- Pus or Discharge: Yellow or green fluid suggests a bacterial infection.
- Fever: A temperature above 100.4°F (38°C) signals your body is fighting a systemic infection.
- Deep or Jagged Edges: Wounds longer than 0.25 inches (6 mm) or deeper than 0.125 inches (3 mm) may need stitches to close properly and minimize scarring.
- No Improvement: If a minor wound hasn’t started closing within 7 days, consult a healthcare provider.
Special caution is needed for diabetic patients. Due to impaired circulation and nerve damage, diabetics have a 40% higher complication rate with wounds. Daily professional assessment is crucial to prevent ulcers and amputations.
Common Mistakes to Avoid
Even well-intentioned caregivers can sabotage healing. Avoid these common pitfalls:
- Using Wet-to-Dry Dressings at Home: These were once standard but are now known to damage healthy granulation tissue when removed. Leave debridement to professionals.
- Taping Around Extremities: Never wrap tape completely around a finger, toe, or limb. This can cut off circulation, causing a tourniquet effect.
- Ignoring Nutrition: Healing requires energy. Dehydration can extend healing time by 25-30%. Aim for 0.5 fluid ounces of water per pound of body weight daily. Protein intake is also vital for tissue repair.
- Overusing Antibiotics: Unless prescribed, avoid heavy use of antibiotic ointments long-term. Plain petroleum jelly is often sufficient for minor cuts and reduces allergy risks.
By sticking to these basics-gentle cleaning, moist coverage, and sun protection-you give your skin the best chance to heal quickly and cleanly. Your future self will thank you when that kitchen mishap leaves no trace behind.
Should I use hydrogen peroxide on a new wound?
No, you should not. Hydrogen peroxide kills bacteria but also destroys healthy human cells, which can delay healing by up to 50%. Stick to rinsing with clean, running water and using mild soap around the edges.
How often should I change a wound dressing?
Generally, change dressings daily or whenever they become wet or dirty. For specific types like hydrocolloids, you may leave them on for 3-7 days unless leakage occurs. Always wash your hands before changing.
What is the best way to prevent a bad scar?
Keep the wound moist during healing, then apply silicone gel or sheets once the skin has closed. Crucially, protect the area from sun exposure with SPF 30+ for at least 12 months to prevent darkening.
When does a cut need stitches?
Seek medical care if the wound is longer than 0.25 inches (6 mm), deeper than 0.125 inches (3 mm), won't stop bleeding after 10 minutes of pressure, or is located on a joint where movement pulls the edges apart.
Is antibiotic ointment necessary for minor cuts?
It is helpful but not always mandatory. Bacitracin is widely recommended, but studies show plain petroleum jelly achieves similar healing outcomes with a lower risk of allergic reactions. Consult your doctor if you have sensitive skin.